Materials
Equipment
Method
- Separate the acorn caps from the acorns. Take note of the general size of the acorns, as you’ll be imitating that size with the felted wool. Although some acorns are almost cylindrical, it’s easiest just to make round wool balls rather than trying to get too fancy copying the exact shape of the acorn.

- Separate a small piece of wool from the loose wool roving. After felting, you’ll want the finished wool ball to fit into the acorn cap. Roll and compress the wool in your fingers and compare against the size of your acorn caps. You can always add more wool to the outside of the acorn later on if it turns out too small.

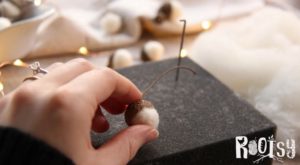
- You’re now ready to begin needle felting. Place the wool onto the felting pad. Use the needle to slowly and carefully poke at the wool. Take note of where your fingers are and make sure you don’t accidentally pierce your fingers with the needle.
- As you poke the wool with the needle, move the wool around by flipping it over and over to create a round ball of wool. Watch what you’re doing and don’t go too fast!
- As the ball develops, compare the wool acorn to the real acorn cap to check that it fits. Check a few acorn caps, as their size can vary. If the wool ball is too small, wrap the ball with an additional thin layer of wool and continue felting. If it’s too big, try to remove some wool or pull it out and start again.

- Once you’re happy with the wool acorn size, glue the wool acorn into the real acorn cap. Let dry.