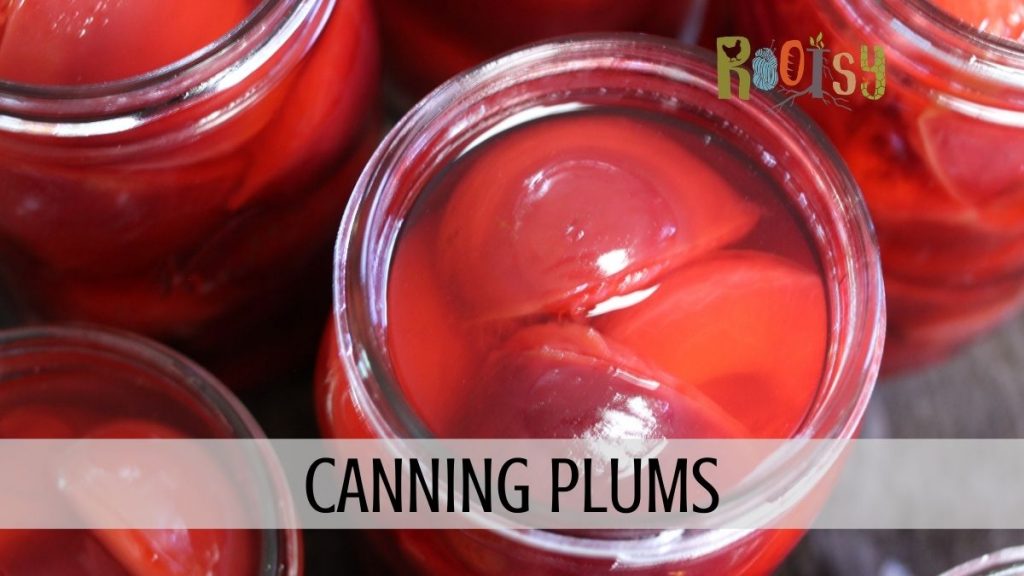
Canning plums is a great way to preserve plums to savor summer all year long. Plums can be canned whole or in halves, plain or sweetened, with or without spices, with or without the pits, and by raw packing or hot packing.
Whether you’re preserving homegrown plums, wild plums, or plums that you purchased, it’s worth the effort to put up a batch of home canned plums to enjoy all year long.
Choosing and Preparing Plums for Canning
All fresh plums can be canned, this includes wild plums, Italian plums, Asian plums or “regular” plums that you’d find in your local grocery store.
When choosing plums for canning it’s important to choose plums that are ripe but still firm. If you use plums that are overripe they will probably fall apart during the canning process.
The plum should be rinsed well to remove any dirt that’s before you cut into them.
There are some plums that have a pit that is easy to remove, these are called freestone plums. To remove the pits, you just cut the plum in half and twist the plum halves to separate. Then you can use your fingers to remove the pit from plum half.
Clingstone plums have a pit that’s not so easy to remove. You can still probably open the plum up the “cut in half and twist” method but it will a little harder. You’ll need a knife to cut the pit out of the plum half that it is clinging to.
The pit of small clingstone plums such as Damsons and wild plums can be removed by using a cherry pitter.
Unlike peaches, plums can be canned whole and the pit can be left intact. You’ll still have to remove the pits when you eat the plums so it’s not really a time saver to can whole plums without removing the pits, it just puts off the chore for a while. Small plums are ideal for canning whole.
If you decide to can whole plums, with or without the pits, you’ll need to prick the skins with a toothpick, fork or knife to keep the skin from popping. This will give the plums room for expanding and will help them hold their shape in the jars.
You’ll need an average of 14 pounds of plums to fill 7 quarts jars and an average of 9 pounds of plums to fill 9 pint jars.

Liquid Options for Canning Plums
Plums, like most fruit, are a high acidic food and can be canned in plain water if you want. However some of the flavor and sweetness of the plums will leach out into the water making the canned plums less tasty. Because of this most people can plums in a simple syrup.
“Adding syrup to canned fruit helps to retain its flavor, color, and shape. It does not prevent spoilage of these foods.“
NCHFP website
I like to use a very light sugar syrup which approximates the natural sweetness of most fruit. To make a very light syrup combine 6 1/2 cups water with 3/4 cup sugar. For a sweeter canned plum use a medium syrup and for a very sweet canned plum use a heavy syrup.
A syrup can also be made with honey or maple syrup, if you prefer, just know that it will change the flavor of the canned plums some.
You can also use fruit juice to can plums and will change the flavor some. Apple and grape juice are common choices for canning plums.
Some people like to put a splash of bourbon or rum in their syrup for canning plums to deepen the flavor some. Some people like to add spices such as a cinnamon stick to each jar to spice the plums a bit.

Hot-pack or Raw-pack Methods
Plums can be canned using both the hot-pack or raw-pack method. As a general rule of thumb, you’ll get better results when you hot-pack fruit than when you raw-pack it. I know it sounds counter-intuitive since the fruit is heated longer but it’s true.
This is especially true with stone fruits which tend to get very soft when raw-packed.
Of course, the choice is yours and both ways are safe, approved methods for canning plums.
Raw-Packing Plums
To raw-pack plums, make and bring to a boil the syrup, water, or juice, you will be using. Then prepare the plums by washing, removing the pits if desired, and cutting in half, if desired. Put the raw plums into clean, hot canning jars and cover with the hot syrup, water or juice, leaving a 1/2 inch headspace.
When raw-packing the plums, it’s helpful to tilt the jar so that you can arrange them better.
Hot-Packing Plums
To hot-pack plums, make and bring to a boil the syrup, water, or juice you’ll be using in a large pot. Then prepare the plum by washing, removing the pits if desired, and cutting in half if desired. Put the prepared plums into the boiling syrup and boil for 2 minutes. Turn off the heat and let the plums sit for 20-30 minutes to heat throughout.
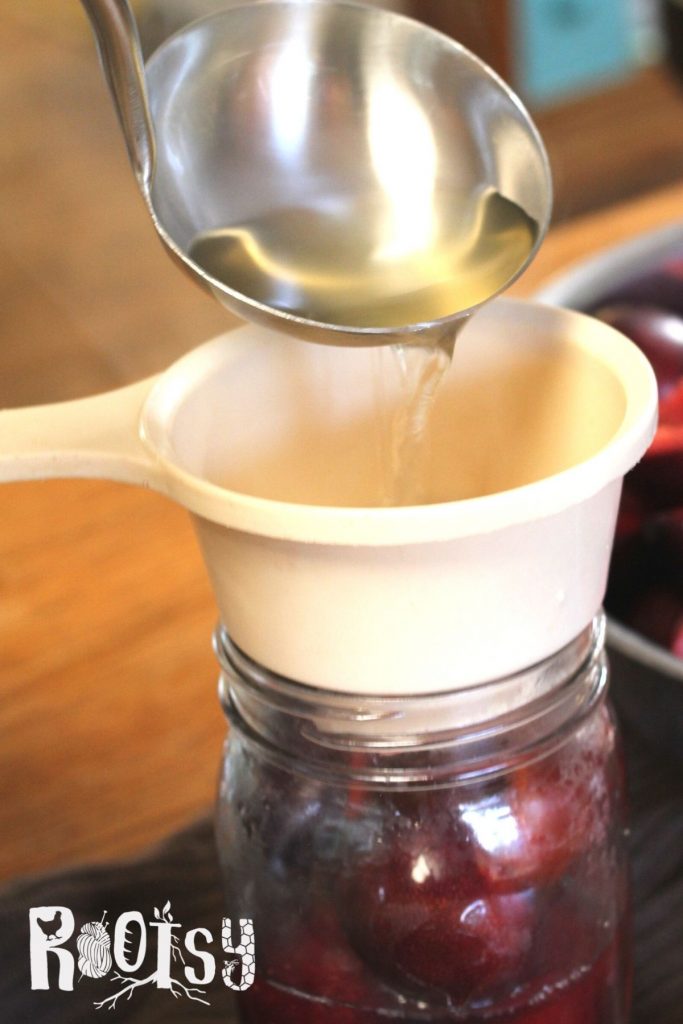
Using a slotted spoon, gently put the hot plums into clean, hot jars and then ladle the hot liquid into the jars leaving a 1/2 inch headspace.

How to Can Plums
Plums can be canned using a water bath canner or a pressure canner. I’ve done it both ways and the results were the same. Although the processing time for pressure canning plums is half it is for water bath canning plums, I’ve not found there to be any time savings when you factor in the time it takes for the pressure canner to pressurize and depressurize.
That being said, both ways are safe and approved methods so I’ll share times for both methods.
Step 1: Prepare the canner, jars, and lids
Wash the canner and racks with hot soapy water. If you’re using a water bath canner, fill it 2/3 of the way full with water and put it on the stove over medium heat. If you’re using a pressure canner, fill it with the amount of water recommended by the manufacturer and put it on the stove over medium heat.
Wash the jars with hot soapy water. I think it’s easier to use wide mouth jars rather than regular mouth jars for canning plums. The jars don’t need to be sterilized since they will be process for 10 minutes or longer. But they do need to stay hot, so I put them in the canner with the hot water until it’s time to fill them.
Wash the lids with hot soapy water. Most metal lids do not need to be kept hot before using, however, read the side of the box if you are unsure if your lids do. If you’re using Harvest Guard reusable lids, they need to be simmered in hot water immediately prior to being used.
Step 2: Prepare the Syrup and Plums
Prepare the syrup, water, or juice that you’ll be using for canning the plums. Put it on the stove and heat to a boil.
Wash plums and remove the pits, if desired. If you are canning whole plums, prick the skin a few times to allow room for expansion. Cut plums in half if you want to can halves.
Step 3: Fill the Jars
Remove the jars from the canner or wherever you had them to stay hot. Pack the plums into the jars using the hot-pack or raw pack method outlined above. Don’t squish or press the plums down as they will lose their shape.
Pour the syrup into the jars and leave a 1/2″ headspace. Using a bubble removal tool, gently remove air bubbles from the jars. Recheck the headspace and add more syrup is necessary to keep the 1/2″ headspace.
If you have any extra syrup, it can be canned by itself. We like to make plum lemonade with our extra syrup.
Wipe jar rims with a clean, damp cloth.
Put the lids on the top of the jar and screw the bands on.
Step 4: Process the Jars
Put the filled jars into the canner using a jar lifter.
If you’re using a water bath canner, the water needs to cover the jars by at least 1″. If it doesn’t, you need to add more water. Bring the water to a full rolling boil and boil for 20 minutes for pint jars and 25 minutes for quart jars.
Adjust the processing time for higher elevations.
- For 1,000 to 3,000 feet -Process 25 minutes for pints and 30 minutes for quarts.
- For 3,000 to 6,000 feet -Process 30 minutes for pints and 35 minutes for quarts.
- Over 6,000 feet -Process 35 minutes for pints and 40 minutes for quarts.
If you’re using a pressure canner, follow the manufacturers instructions for pressurizing the canner.
For weighted gauge pressure canners, process for 10 minutes at 5 psi for elevations up to 1000 feet. For elevations above 1000 feet, process for 10 minutes at 10 psi.
For a dial gauge pressure canner process for 10 minutes using the pressures listed below
- For 0 – 2,000 feet – 6psi
- For 2,000 to 4,000 feet – 7psi
- For 4,000 to 6,000 feet -8psi
- Over 6,000 feet – 9psi
Once the processing is complete, remove the jars and let them cool on a towel on the counter for 12-24 hours. If you’re using a pressure canner, make sure to let the canner completely depressurize naturally before opening it.
Tried this recipe? Please leave a ⭐️⭐️⭐️⭐️⭐️ star rating in the recipe card below and/or a review in the comment section further down the page. We always appreciate your feedback. You can also save the recipe for later by pinning it or clicking on the heart in the lower right hand corner.

Canning Plums
Ingredients
Equipment
Method
- Wash canner, jars, and lids. Prepare water bath canner by filling 2/3 full of hot water. Prepare pressure canner by adding the amount of water recommended by the manufacturer.
- Put the canner on the stove and heat over medium heat. Put the jars in the canner to keep them hot.
- Combine the water and sugar in a large stock pot and bring to a boil over medium high heat.
- Wash the plums. Prepare the plums by removing the pits if desired. If canning whole plums, prick the skin a few times. Cut plums in half for canning plum halves.
- For hot packing the plums, put the prepared plums into the stockpot of boiling syrup and boil for 2 minutes. Turn off the heat and let them sit for 20-30 minutes to heat thoroughly.
- Pack the raw or heated plums into the hot jars.
- Ladle the syrup into the jars leaving a 1/2" headspace.
- Wipe jar rims with a clean, damp cloth.
- Add lids and bands to jars.
- Put the jars into the canner and process according the information below.
- Once the processing is complete, remove the jars from the canner and allow to cool 12-24 hours on a towel on the counter.
- Once the jars are completely cooled, check the seals to make sure they all sealed correctly. If any didn't you can put them in the refrigerator to use within a week.
- Label the jars and store in a cool, dry place for up to 1 year.
- If you're using a water bath canner, the water needs to cover the jars by at least 1". If it doesn't, you need to add more water. Bring the water to a boil and boil for 20 minutes for pints and 25 minutes for quarts.
- Adjust the processing time for higher elevations.
- For 1,000 to 3,000 feet -Process 25 minutes for pints and 30 minutes for quarts.
- For 3,000 to 6,000 feet -Process 30 minutes for pints and 35 minutes for quarts.
- Over 6,000 feet -Process 35 minutes for pints and 40 minutes for quarts.
- If you're using a pressure canner, follow the manufacturers instructions for pressurizing the canner.
- For weighted gauge pressure canners, process for 10 minutes at 5 psi for elevations up to 1000 feet. For elevations above 1000 feet, process for 10 minutes at 10 psi.
- For a dial gauge pressure canner process for 10 minutes using the pressures listed below
- For 0 – 2,000 feet – 6psi
- For 2,000 to 4,000 feet – 7psi
- For 4,000 to 6,000 feet -8psi
- Over 6,000 feet – 9psi
- Make sure to let the canner completely depressurize naturally before opening it.
Tried this recipe?
Let us know how it was!
Other Ways to Use and Preserve Plums
Make the most of plum season by making some of these plum recipes…
Recipe Source
This recipe is based on the tested guidelines from the National Center for Home Food Preservation.
How would you use these canned plums other than eating out of the jar?
You can add them to yogurt, use them over pancakes or in oatmeal. They can be blended with the liquid and used to flavor lemonade or teas.
I made this recipe and mine come out bitter
There’s nothing in the recipe that would cause the plums to be bitter. Maybe they were bitter to begin with and you will need to add more sugar?